配音圈配音

文章发布时间:

最后更新时间:

配音圈配音的模块化

ES6的Class 类
在传统的js语法当中,如果我们想创建一个实例对象的时候一般会先定义一个构造函数,然后通过new运算符来创建一个实例对象,例如:

  • 1
    2
    3
    4
    5
    6
    7
    8
    9
    10
    11
    12
    13
    function Person(name,age){
    this.name = name
    this.age = age
    }
    Person.prototype.showName = function(){
    console.log(this.name)
    }
    Person.prototype.showAge = function(){
    console.log(this.age)
    }
    var person = new Person('xz',21)
    person.showName()//'xz'
    person.showAge()//21

我们定义一个Person的构造函数,然后通过new Person()来创建一个实例对象。一般我们向构造函数的原型上添加方法,表示实例要继承的方法,这个方法是公共的,不是某个实例自己特有的方法。这样我们就可以完成一个具体的实例了。
而在ES6中,为我们提供了一个叫Class的一个方法,让我们能够更容易理解和创建一个实例对象。例如:

1
2
3
4
5
6
7
8
9
10
11
12
13
14
15
class Person {
constructor(name,age){
this.name = name
this.age = age
}
showName(){//为我们的实例添加继承的方法
console.log(this.name)
}
showAge(){//为我们的实例添加继承的方法
console.log(this.age)
}
}
var person = new Person('xz',21)
person.showName()//'xz'
person.showAge()//21

注意:

     -  如果使用es6的class类语法要注意一点就是 `constructor`方法是类默认方法,通过`new`命令生成对象实例时自动调用该方法。一个类必须有一个`constructor`方法,如果没有显示定义,那么一个空的`constructor`方法会被默认添加。 
     -  类的声明不存在变量提升 
1
2
3
4
5
6
7
new Person()//报错,因为类的声明不存在变量提升
class Person{
constructor(){
this.name = 'xz'
this.age = 21
}
}

js类的继承
根据ES6的语法,super关键字,extends来进行类的继承操作
我们可以通过extends关键字来实现子类对父类的继承。子类必须在constructor方法中调用super方法,否则新建的实例会报错。原因在于子类没有自己的this对象,而是继承父类的this对象,然后进行加工,如果不调用super关键字,那么子类就拿不到this对象,而super在其中表示的其实是父类的构造函数

1
2
3
4
5
6
7
8
9
10
11
12
13
14
15
16
class sup{
constructor(){}
show(){//向父类的原型上挂载show()方法
console.log('sup')
}
}
class sub extends sup{
constructor(){
super()
}
showinfo(){
console.log(super.show())
}
}
var obj = new sub()
obj.showinfo()//sup

配音圈配音的utils里有6个文件,模块化的大致思路是一样的。举例:

  • config.js

    1
    2
    3
    4
    5
    6
    7
    8
    9
    10
    class Config{
    constructor(){

    }
    }
    Config.restUrl = 'https://dub.wuhanzhuangxiu01.cn';
    Config.onPay = true; //是否启用支付
    ........

    export {Config};
  • base.js

    1
    2
    3
    4
    5
    6
    7
    8
    9
    10
    11
    12
    13
    14
    15
    16
    17
    18
    19
    20
    21
    22
    23
    24
    25
    26
    27
    28
    29
    30
    31
    32
    33
    34
    35
    36
    37
    38
    39
    40
    41
    42
    43
    44
    45
    46
    47
    48
    49
    50
    51
    52
    53
    54
    55
    56
    57
    58
    59
    60
    61
    62
    63
    64
    65
    66
    67
    68
    69
    70
    71
    72
    73
    74
    /**
    * 自定义基类
    */
    import {
    Config
    } from './config.js';

    var app = getApp();

    class Base {

    constructor() {
    this.baseRequestUrl = Config.restUrl;
    }

    /**
    * 封装request请求
    */
    request(params, noRefetch) {
    var url = this.baseRequestUrl + params.url;
    var that = this;

    /* 判断请求方式 默认为'POST' */
    if (!params.type) {
    params.type = 'POST';
    }

    wx.request({
    url: url,
    data: params.data,
    header: {
    'content-type': 'application/json',
    'token': wx.getStorageSync('token'),
    },
    method: params.type,
    dataType: 'json',
    responseType: 'text',
    success: function (res) {
    // res.data.param.disable == 1? wx.setStorageSync('disable', 1): wx.setStorageSync('disable', 0);
    var code = res.statusCode.toString();
    var startChar = code.charAt(0);
    if (startChar == '2') {

    params.sCallback && params.sCallback(res.data);
    } else {
    that._processError(res);
    params.eCallback && params.eCallback(res.data);
    }
    },
    fail: function (res) {

    that._processError(res);
    },
    })
    }
    /**
    * 消息提示
    */
    showToast(title, icon) {
    if (!icon) {
    icon = 'none';
    }
    wx.showToast({
    title: title,
    icon: icon,
    duration: 2000,
    })
    }
    ........
    }

    export {
    Base
    };
  • public.js

    1
    2
    3
    4
    5
    6
    7
    8
    9
    10
    11
    12
    13
    14
    15
    16
    17
    18
    19
    20
    21
    22
    23
    24
    25
    26
    27
    28
    29
    30
    31
    /**
    * Home
    * 自定义类
    */
    import {
    Base
    } from '../../utils/base.js';

    class Public extends Base {
    constructor() {
    /* 必须: 调用基类的构造函数 */
    super();
    }
    /**获取金牌推荐 */
    gold_recommend(data, callback) {
    var params = {
    url: '/gold_list',
    data: data,
    sCallback: function (res) {
    callback && callback(res);
    },
    }
    this.request(params);
    }
    ........
    }

    /* 输出类HOME */
    export {
    Public
    };
  • 使用

    1
    2
    3
    4
    5
    6
    7
    8
    9
    10
    11
    12
    13
    14
    15
    16
    17
    18
    import {
    Public
    } from '../tpls/public.js';
    var pub = new Public();
    Page({
    onLoad(){
    pub.gold_recommend({
    'page': 1,
    'limit': 5
    }, (res) => {
    if (res.code == 200) {
    that.setData({
    GlodList: res.data
    })
    }
    });
    }
    })

登录模块

小程序的生命周期


  • onReady 生命周期函数–监听页面初次渲染完成
    onShow 生命周期函数–监听页面显示
    onHide 生命周期函数–监听页面隐藏
    onUnload 生命周期函数–监听页面卸载
    onPullDownRefresh 页面相关事件处理函数–监听用户下拉动作
    onReachBottom 页面上拉触底事件的处理函数
    onShareAppMessage 用户点击右上角转发
    onPageScroll 页面滚动触发事件的处理函数
    onTabItemTap 当前是 tab 页时,点击 tab 时触发

配音圈配音因为是用原生微信小程序进行编写的,没有watch,没有vuex,所以看似很简单的方式就很难实现。就比如进入到小程序里面先进行登录获取头像以及openid,在通过拿到的openid进行身份判断。这里的身份判断要在首页里展示,所以写在首页的onload里,而登录这个东西最早用,并且很多地方用。所以写在小程序的onlaunch函数里。但是因为onlaunch里执行的登录获取openid是个请求,有异步效果。所以在小程序执行完页面的生命周期函数的时候,可能还没有拿到openid。而配音圈配音通过一个回调函数解决了这个问题。
总结来说就是微信小程序app.js的onLaunch中的异步请求执行完之后再执行Page的onLoad
app.js

1
2
3
4
5
6
7
8
9
10
11
12
13
14
15
16
17
18
19
20
21
22
23
24
25
26
27
App({
globalData: {
employ: '',
onLaunchData: null,
},
onLaunch: function () {
console.log("onlaunch");
let that = this;
wx.request({
url: 'http://101.35.96.100:8001/miniprograms/tideForecast/getAreaList',
method: 'POST',
data: {},
success: function (res) {
console.log(res);
//设置请求的值
that.globalData.onLaunchData = res.data.data
//设置请求状态
that.globalData.employ = true;
//由于这里是网络请求,可能会在 Page.onLoad 之后才返回 在onLoad中定义下app.employCallback 后才执行下述that.employCallback(true),此时用户数据肯定得到了,回调内再则可获取到用户数据
//所以此处加入 callback 以防止这种情况
if (that.employCallback) {
that.employCallback(true);
}
},
});
},
})

index.js

1
2
3
4
5
6
7
8
9
10
11
12
13
14
15
16
17
18
19
20
21
22
23
24
25
26
27
28
29
30
const app = getApp()
Page({
data: {
onLaunchData:null,
},
onLoad: function (options) {
let that = this;
console.log("onload");
if (app.globalData.employ && app.globalData.employ != '') {
console.log("first")
let onLaunchData = app.globalData.onLaunchData;
that.setData({
onLaunchData: onLaunchData ? onLaunchData : null
});
} else {
// 由于 onLaunch里执行的 是网络请求,可能会在 Page.onLoad 之后才返回
// 所以此处加入 callback 以防止这种情况
app.employCallback = employ => {
console.log("进入到app.employCallback");
console.log(that);
if (employ != '') {
console.log(employ);
that.setData({
onLaunchData: app.globalData.onLaunchData
});
}
}
}
},
})

这里执行的流程是当微信小程序运行时,首先进入到了onLaunch进行执行,因为onLaunch里面有request是异步请求,所以压力来到了index.js的onload里面,在onload里去判断app.js里的数据状态是什么样的,是true就拿request里的数据,如果没有就对app,js的app对象进行添加一个回调函数属性,在这个回调函数属性里需要传入一个true就能操作index.js的page对象里的data,给onlaunch里请求的值赋值给index.js的page对象里的data。这个时候因为之前在onLaunch写的调用自己的在index.js里写的回调,并传入true,对index.js中data中的数据进行赋值。

h5上传文件模块

参考资料
Uniapp 内嵌H5跳转内嵌小程序页面
uniapp h5项目点击跳转小程序,h5传参到小程序
微信小程序与h5通过web-view传值
[填坑手册]小程序web-view组件实战与踩坑
首先因为微信小程序无法打开本地资源管理器。所以都是通过微信的wx.chooseMessageFile进行在本地聊天记录中选取文件。(这种方法也是目前大部分小程序采取上传文件的方式优点是:速度快、兼容性好。缺点:用户需要提前把文件发送给自己聊天列表中的随便一个人)
wx.chooseMessageFile代码实现

1
2
3
4
5
6
7
8
wx.chooseMessageFile({
count: 10,
type: 'file', // 选择了除图片和视频的文件
success (res) {
// tempFilePath可以作为 img 标签的 src 属性显示图片
const tempFilePaths = res.tempFiles
}
})

现在需要直接通过微信小程序去访问本地的资源管理器。我的解决思路的是,通过微信小程序使用webview去调用一个h5页面。在通过h5页面去调用本地资源。选取后将资源上传服务器,在返回到小程序。这里比较困难的是小程序向webview传值以及webview跳回小程序,以及返回参数到小程序。
这里首先需要写一个h5的页面进行上传文件,这里需要引入小程序的一个sdk,uniapp使用 npm install --save-dev weixin-js-sdk。然后在main.js里进行全局引入let jweixin = require('jweixin-module') Vue.prototype.$wx = jweixin

1
2
3
4
5
6
7
8
9
10
11
12
13
14
15
16
17
18
19
20
21
22
23
24
25
26
27
28
29
30
31
32
33
34
35
36
37
38
39
40
41
42
43
44
45
46
47
48
49
50
51
52
53
54
55
56
57
58
59
60
61
62
63
64
65
66
67
68
69
70
71
72
73
74
75
76
77
78
79
80
81
82
83
84
85
86
87
88
89
90
91
92
93
94
95
96
97
98
99
100
101
102
103
104
105
106
107
108
109
110
111
112
113
114
115
116
117
118
119
120
121
122
123
124
125
126
<template>
<view class="content">
<view class="add-btn">
<text class="text" @click="openFile">添加附件</text>
</view>
</view>
</template>

<script>
import wx from '@/static/activity_sdk.js';
export default {
data() {
return {
title: 'Hello',
id: '',
token: ''
}
},
methods: {
// 打开文件选择器
openFile() {
let that = this
uni.chooseFile({
count: 1, //默认100
extension: ['.mp3', '.m4a'],
success: (res) => {
console.log(res);
if (res.tempFiles[0].size / 1024 / 1024 > 20) {
that.$refs.uToast.show({
title: '附件大小不能超过20M',
type: 'warning',
})
return;
}
var params = {
path: res.tempFilePaths[0],
name: res.tempFiles[0].name,
orderid: 0,
}
that.uploadFile(params);
}
});
},

uploadFile(params, noRefetch) {
uni.showLoading({
title: '上传中...',
});
var that = this;
var url = 'https://dub.wuhanzhuangxiu01.cn/uploadMusic';
var name = params.name ? params.name : '';
var key = params.key ? params.key : '';
var ii = params.ii ? params.ii : 0;
var orderid = params.orderid ? params.orderid : 0;
var id = that.id ? that.id : 0;
uni.uploadFile({
url: url,
filePath: params.path,
fileType: 'audio',
name: 'file',
header: {
'token': that.token,
},
formData: {
'path': params.path,
'name': name,
'key': key,
'ii': ii,
'uid': id,
'orderid': orderid
},
success: function(res) {
var data = JSON.parse(res.data);
uni.hideLoading();
that.$wx.miniProgram.postMessage({
data: {
name: data,
}
});
that.$wx.miniProgram.navigateBack({
delta: 1
})
},
fail: function(res) {
console.log('fail:', res);
uni.hideLoading();
uni.showLoading({
title: '上传失败',
icon: 'error'
});
that.$wx.miniProgram.navigateBack({
delta: 1
})
},
})
},
},
onLoad(e) {
console.log('h5页面', e);
this.id = e.id
this.token = e.token
}
}
</script>

<style>
.add-btn {
width: 100%;
height: 100vh;
display: flex;
justify-content: center;
align-items: center;

}

.add-btn text {
display: block;
text-align: center;
line-height: 100rpx;
width: 80%;
height: 100rpx;
background-color: cadetblue;
border-radius: 20rpx;
/* margin: 0 auto; */
}
</style>

这里从webview的网页跳回小程序有个问题。就是只能用navigateBack进行返回。文档上说的是navigateTo、navigateBack、switchTab、reLaunch、redirectTo都能使用,但是在我的环境下只能使用navigateBack进行返回。传值我是通过webview的bindmessage属性进行传值。首先在webview定义好属性写好回调。在h5页面,使用wx.miniProgram.postMessage来进行传值。传的值会在 bindmessage定义好的函数里形参里。
因为之前我是使用 navigateBack进行返回的。所以返回的值一直在webview页面。我需要传值给我的返回的这个界面。我在app.js里面定义一个属性进行页面之间的通信。在webview页面接受传回来的值,存放在app.js上面的属性。在跳转的页面进行拿取传过来的值。就能完成从webview传值给微信小程序。
微信小程序webview示例代码:

1
2
3
4
5
6
7
8
9
10
11
12
13
14
15
16
17
18
19
20
21
22
23
24
25
26
27
28
29
30
31
32
33
34
35
36
37
38
39
40
41
42
43
44
45
46
47
48
49
50
51
52
53
54
55
56
57
58
59
60
61
62
63
64
65
66
67
68
69
70
71
72
73
74
75
76
77
78
79
80
81
82
83
84
85
86
87
88
89
90
91
92
93
94
95
96
97
98
99
100
101
102
103
104
105
106
107
108
109
110
111
112
113
114
115
116
117
118
119
120
121
122
123
124
125
126
<template>
<view class="content">
<view class="add-btn">
<text class="text" @click="openFile">添加附件</text>
</view>
</view>
</template>

<script>
import wx from '@/static/activity_sdk.js';
export default {
data() {
return {
title: 'Hello',
id: '',
token: ''
}
},
methods: {
// 打开文件选择器
openFile() {
let that = this
uni.chooseFile({
count: 1, //默认100
extension: ['.mp3', '.m4a'],
success: (res) => {
console.log(res);
if (res.tempFiles[0].size / 1024 / 1024 > 20) {
that.$refs.uToast.show({
title: '附件大小不能超过20M',
type: 'warning',
})
return;
}
var params = {
path: res.tempFilePaths[0],
name: res.tempFiles[0].name,
orderid: 0,
}
that.uploadFile(params);
}
});
},

uploadFile(params, noRefetch) {
uni.showLoading({
title: '上传中...',
});
var that = this;
var url = 'https://dub.wuhanzhuangxiu01.cn/uploadMusic';
var name = params.name ? params.name : '';
var key = params.key ? params.key : '';
var ii = params.ii ? params.ii : 0;
var orderid = params.orderid ? params.orderid : 0;
var id = that.id ? that.id : 0;
uni.uploadFile({
url: url,
filePath: params.path,
fileType: 'audio',
name: 'file',
header: {
'token': that.token,
},
formData: {
'path': params.path,
'name': name,
'key': key,
'ii': ii,
'uid': id,
'orderid': orderid
},
success: function(res) {
var data = JSON.parse(res.data);
uni.hideLoading();
that.$wx.miniProgram.postMessage({
data: {
name: data,
}
});
that.$wx.miniProgram.navigateBack({
delta: 1
})
},
fail: function(res) {
console.log('fail:', res);
uni.hideLoading();
uni.showLoading({
title: '上传失败',
icon: 'error'
});
that.$wx.miniProgram.navigateBack({
delta: 1
})
},
})
},
},
onLoad(e) {
console.log('h5页面', e);
this.id = e.id
this.token = e.token
}
}
</script>

<style>
.add-btn {
width: 100%;
height: 100vh;
display: flex;
justify-content: center;
align-items: center;

}

.add-btn text {
display: block;
text-align: center;
line-height: 100rpx;
width: 80%;
height: 100rpx;
background-color: cadetblue;
border-radius: 20rpx;
/* margin: 0 auto; */
}
</style>

这部分代码中的wxml部分,src部分写的很复杂。只有这么写,才能带参数,访问这个h5页面。之前我是先将url合并之后一块给src,但是这个h5会在链接自动生成#在路径里。然后微信这边会自动将#号过滤掉。这个#号是因为路由器的两种工作模式之一的hash模式造成的。

详解可见 Uniapp发布为H5版本时如何隐藏访问路径的#符号

原型与原型链

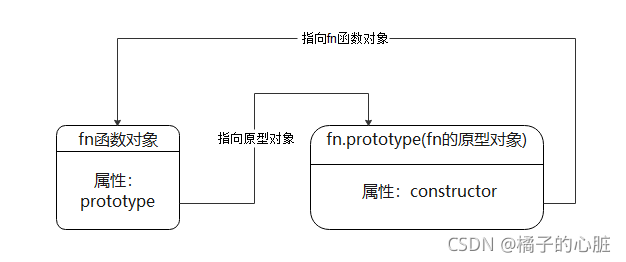
  • 所有函数都有一个特别的属性:**prototype**** : 显式原型属性**

    • 每个函数都有一个prototype属性, 它默认指向一个Object空对象
    • 原型对象中有一个属性constructor, 它指向函数对象
    • 作用: 函数的所有实例对象自动拥有原型中的属性(方法)
      1
      2
      3
      4
      5
      6
      7
      8
      9
      10
      11
      //fun的prototype默认指向一个Object空对象
      console.log(Fun.prototype);
      // 原型对象中有一个属性constructor, 它指向函数对象
      console.log(Fun.prototype.constructor == Fun)

      Fun.prototype.test = function(){
      console.log('我是Fun原型上的一个方法');
      }
      let fun = new Fun()
      // 给原型对象添加的属性 ==> 实例对象可以访问
      fun.test()
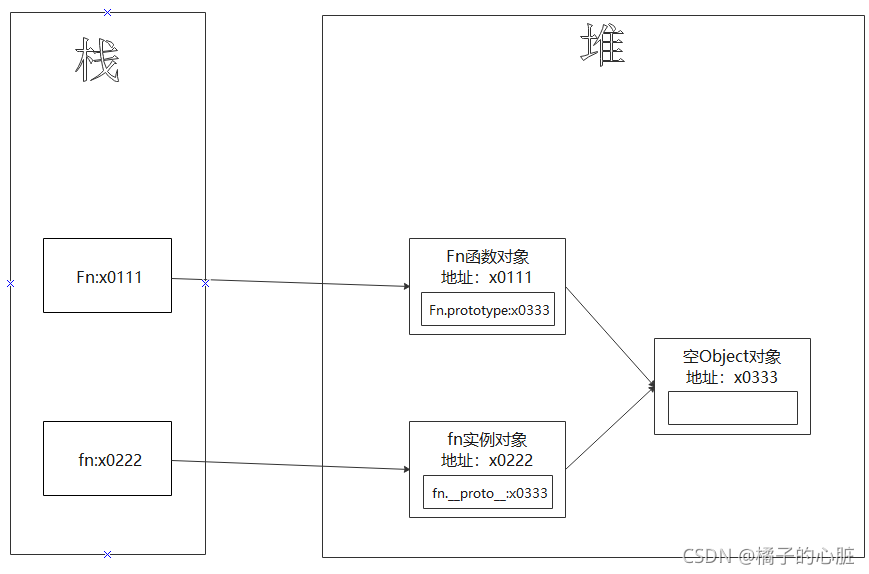
  • 所有实例对象都有一个特别的属性:**__proto__**** : 隐式原型属性**

    • 对象的隐式原型的值为其对应构造函数的显式原型的值
      1
      2
      3
      4
      5
      6
      function Fun(){

      }
      let fun = new Fun()
      console.log(Fun.prototype === fun.__proto__)
      // 返回结果是true

function Fun(){}就相当于在内部 this.prototype = {}
let fun = new Fun()就相当于在内部 this.__proto__ = Fn.prototype

  • 显示原型与隐式原型在堆和栈上的结构图
    1
    2
    3
    function Fn(){};
    var fn = new Fn();
    console.log(fn.__proto__===Fn.prototype);
  • 原型链
    所有的实例对象都有__proto__属性, 它指向的就是原型对象。这样通过__proto__属性就形成了一个链的结构—->原型链
    1. 当查找对象内部的属性/方法时, js引擎自动沿着这个原型链查找
    2. 当给对象属性赋值时不会使用原型链, 而只是在当前对象中进行操作
    3. 别名: 隐式原型链
    4. 作用: 查找对象的属性(方法)

代码

1
2
3
4
5
6
7
8
9
10
11
12
13
function Fn(){
this.test1 = function(){
console.log("test1()");
}
}
Fn.prototype.test2 = function(){
console.log("test2()")
}
let fn = new Fn()
fn.test1()
fn.test2()
console.log(fn.toString());
fn.test3()

图解

  • 注意:
    1. 函数的显示原型指向的对象默认是空Object实例对象(但Object不满足)

      1
      2
      3
      console.log(Fn.prototype instanceof Object) // true
      console.log(Object.prototype instanceof Object) // false
      console.log(Function.prototype instanceof Object) // true
    2. 所有函数都是Function的实例(包含Function)

1
console.log(Function.__proto__===Function.prototype)// true
  1. Object的原型对象是原型链尽头
    1
    console.log(Object.prototype.__proto__) // null